Quick Start
This repository hosts the source code of the FANUC ROS 2 Driver project, a ros2_control high-bandwidth streaming driver. This project will allow you to develop a ROS 2 application to control a FANUC virtual or real robot.
Note
This guide assumes basic familiarity with ROS 2, Ubuntu, and FANUC hardware.
System Requirements
Operating System: Ubuntu 22.04 LTS (optionally with real-time PREEMPT_RT kernel installed)
ROS 2 Distribution: Humble Hawksbill
FANUC Robot Controller:
R-30iB Mini Plus
R-50iA
Software Options:
J519 Stream Motion and R912 Remote Motion, or
S636 External Control Package (includes both J519 and R912)
FANUC Robot: CRX series
1. Install Dependencies
Set up the ROS 2 Environment
Follow the official ROS 2 Installation Guide for the Desktop Install of ROS 2 Humble.
Configure the ROS 2 Environment
We recommend performing the following tasks in the ROS 2 Configuring Environment:
Add sourcing to your shell startup script
The ROS_LOCALHOST_ONLY variable
2. Install FANUC software packages
Choose one of the following installation methods:
Source Build of FANUC Packages
Debian Install of FANUC Packages
Method 1: Source Build of FANUC Packages
echo "Installing and configuring git-lfs"
sudo apt install git-lfs
git lfs install

echo "Checking out GitHub repositories"
mkdir ~/ws_fanuc/src -p
cd ~/ws_fanuc/src
git clone https://github.com/FANUC-CORPORATION/fanuc_description.git
git clone --recurse-submodules https://github.com/FANUC-CORPORATION/fanuc_driver.git

echo "Installing FANUC dependencies"
cd ~/ws_fanuc
sudo apt update
rosdep update
rosdep install --ignore-src --from-paths src -y

echo "Building FANUC libraries"
colcon build --symlink-install --cmake-args -DBUILD_TESTING=1 -DBUILD_EXAMPLES=1
Method 2: Debian Install of FANUC Packages
Debian packages will be provided at a future date.
3. Launching URDF Visualization
The view_crx launch file visualizes a URDF model in RViz and provides slider bars to visualize a specific joint state.
source /opt/ros/humble/setup.bash
source ~/ws_fanuc/install/setup.bash
ros2 launch fanuc_crx_description view_crx.launch.py robot_model:=crx10ia

4. Create Moveit Config
fanuc_moveit_config is an example MoveIt configuration package which supports the following robot models.
CRX-5iA
CRX-10iA
CRX-10iA/L
CRX-20iA/L
CRX-30iA
CRX/30-18A
When you want to use other models, create your MoveIt configuration package following this page.
5. Launching with Mock Hardware
The fanuc_moveit launch file starts ROS processes to control a URDF model using ros2_control and MoveIt2.
source /opt/ros/humble/setup.bash
source ~/ws_fanuc/install/setup.bash
ros2 launch fanuc_moveit_config fanuc_moveit.launch.py robot_model:=crx10ia use_mock:=true
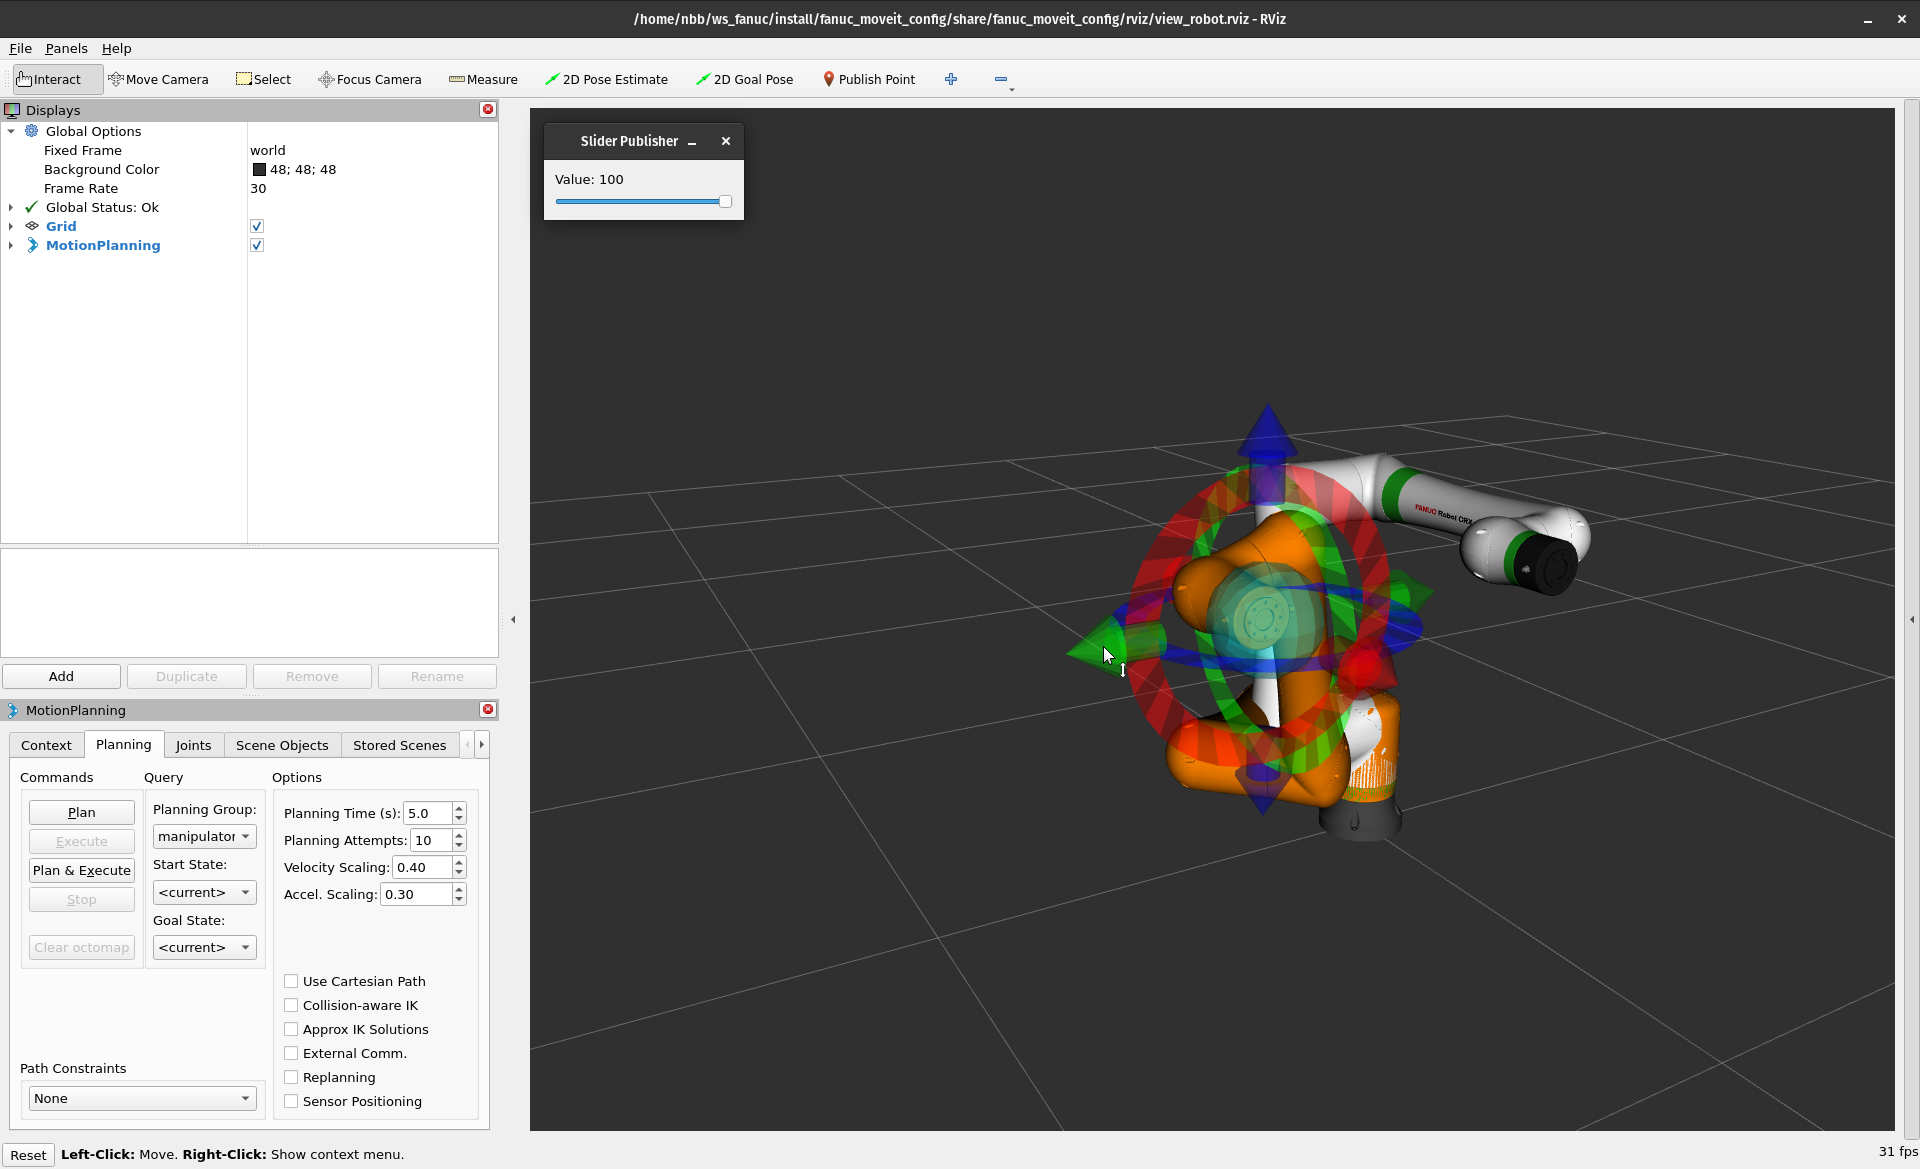
RViz will launch with a visualization of the CRX-10iA.
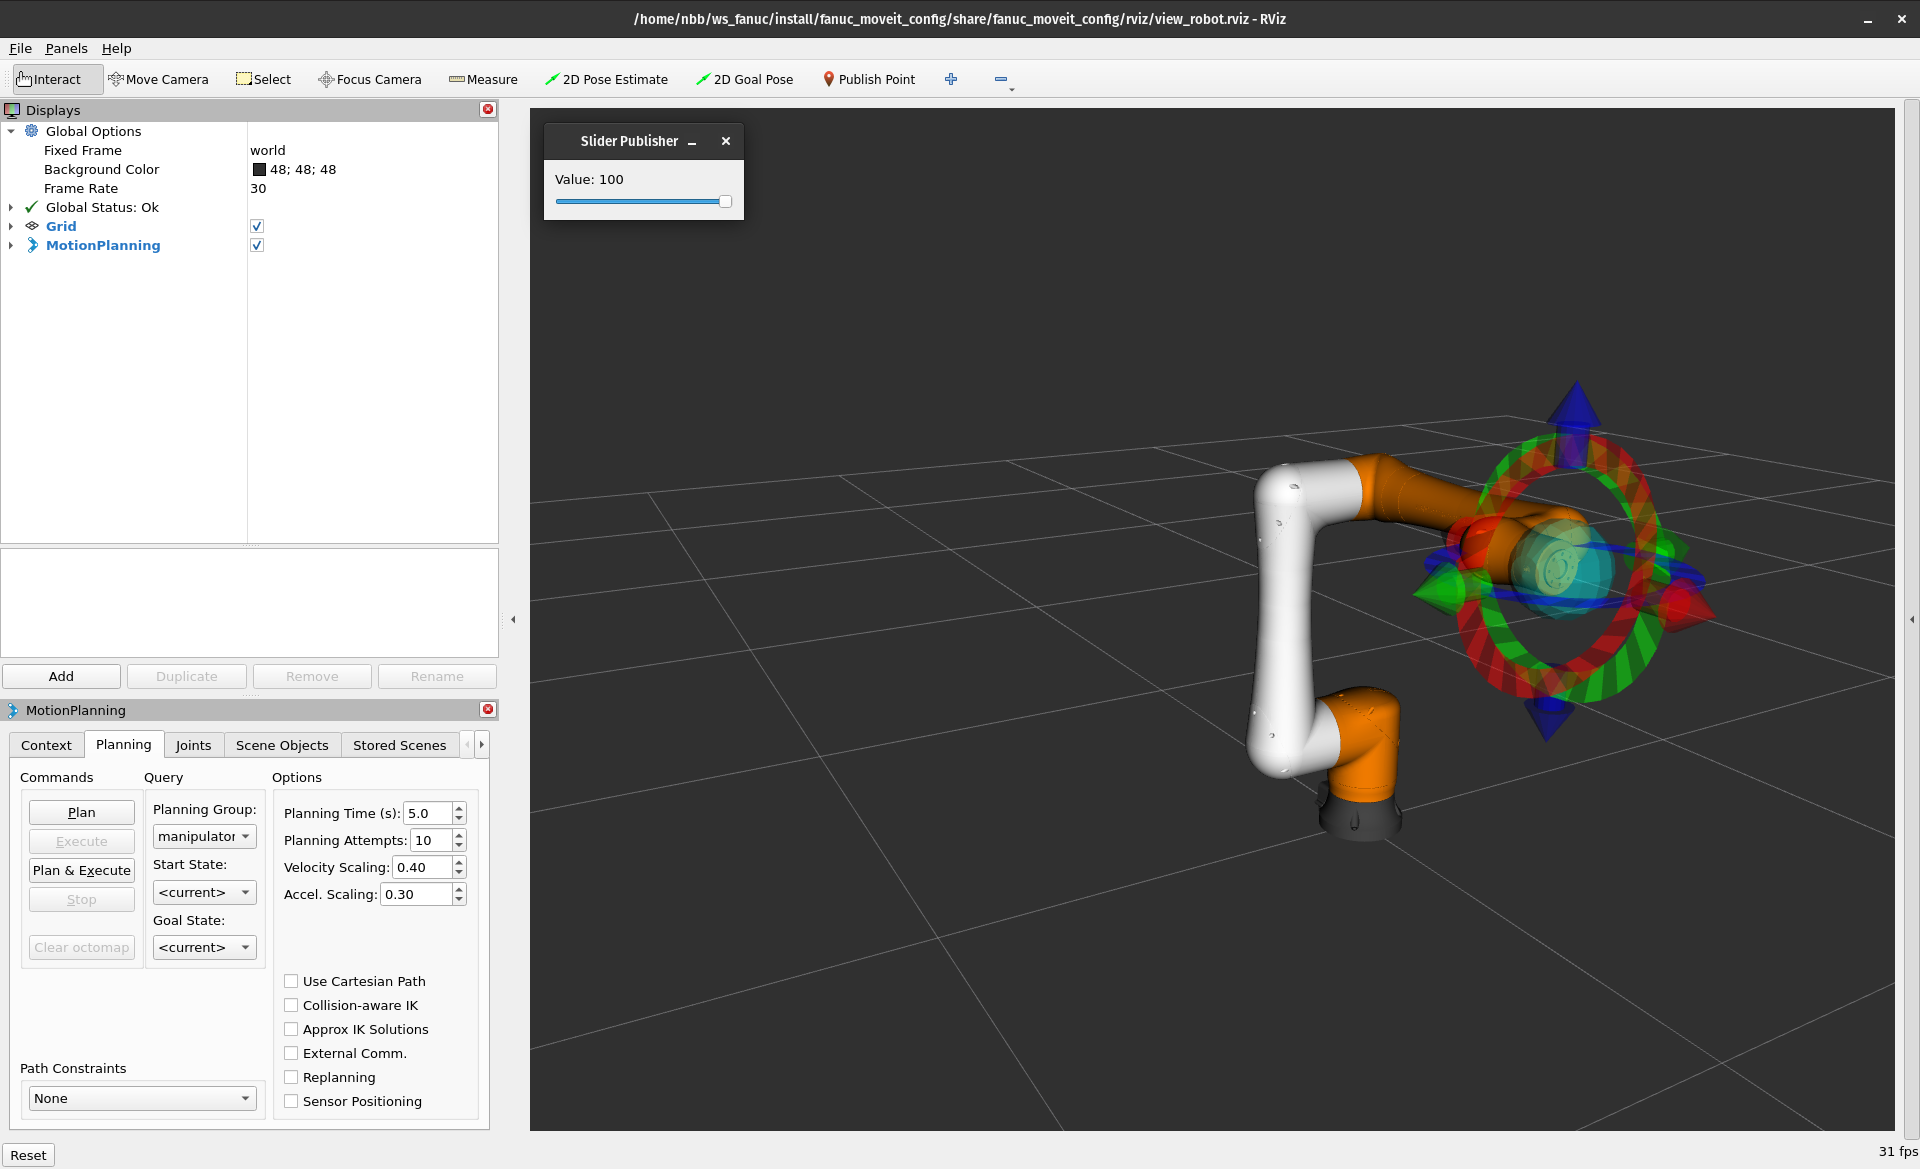
Drag the 3-D arrows to set a goal pose for the robot.
Then click Plan & Execute to simulate the robot planning and executing a trajectory to the goal.
Dynamically scaling trajectory execution
The fanuc_moveit launch file configures a Scaled Joint Trajectory Controller (SJTC), which enables us to slow down and pause trajectories while they are executed.
Set the trajectory speed scaling factor to 10% by Slider Publisher value.
Drag the IMarker to a new location and click Plan & Execute.
The robot will move slowly to the goal.
Now, set the speed scaling factor to 0% and see it pause its motion.
Set it back to 100% and the robot will complete the remainder of the trajectory at its nominal speed.
6. Launching with Physical Hardware
Now we will use the same SJTC on the physical hardware.
We will use the same fanuc_moveit launch file, but provide a different set of arguments that will use the physical hardware interface instead of mock hardware.
Robot Controller Setup
Requires software version:
R-30iB Mini Plus: V9.40P/77 or later
R-50iA: contact FANUC
Requires software options:
J519 Stream Motion and R912 Remote Motion, or
S636 External Control Package (includes J519 and R912)
Confirm that the required robot controller software is installed
Display FULL MENUS.
Select STATUS.
Select Version ID.
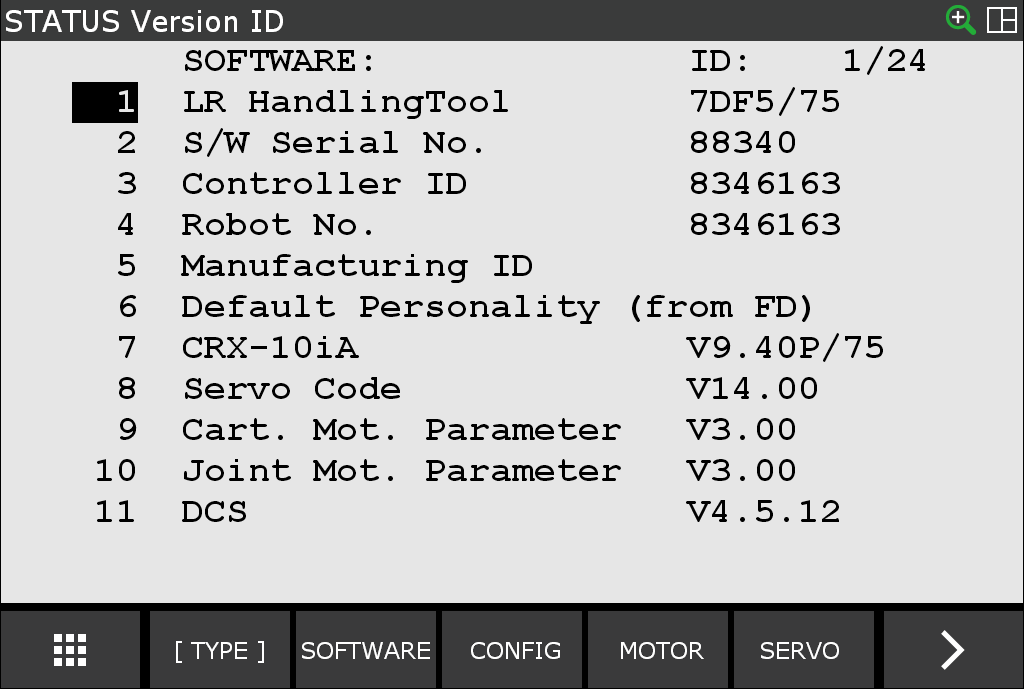
Select CONFIG.

Note
Software options are listed in alphabetical order.
Cursor until you find Stream Motion J519 and Remote Motion R912 or S636 External Control Package.
If you cannot find Stream Motion J519 and Remote Motion R912, or S636 External Control Package, contact FANUC to obtain the software option.
Establish Payload Settings
Accurately setting your robot’s payload is important. Changing payload requires the client to execute the following steps:
Bring the robot to a stop.
Deactivate the hardware interface.
Change the payload.
Reactivate the hardware interface.
Resume your application.
Driver Network Configuration
The ROS 2 Control Driver requires a network connection to the robot, which can be either port 1 or port 2. It is recommended that the ROS 2 network be on a port that is isolated from all other Ethernet communications.
First, we will set IP addresses for each of the Ethernet connections.
If your computer has two network interfaces (one to connect to the Internet and another to connect to robot controller) each needs a different connection profile.
To set these up, click the arrow at the upper right corner of the screen, and then click Settings > Network.
Unplug the Ethernet cable between the computer and your network infrastructure. One of the two wired interfaces will now show up as “Cable unplugged.” Click the gear icon next to that wired adapter.
Under the
Identitytab, give this profile a name (like “Internet”).Click
Applyto accept the default values for the other settings.Plug the Ethernet cable back in.
Now, click the gear icon next to the other network adapter.
Under the
Identitytab, assign a name to the connection profile, such as “Robot”.Under the
IPv4tab, selectManualas theIPv4 Method.Enter
192.168.1.101for the Address, and255.255.255.0for the Netmask.Click
Apply.

Robot Network Configuration
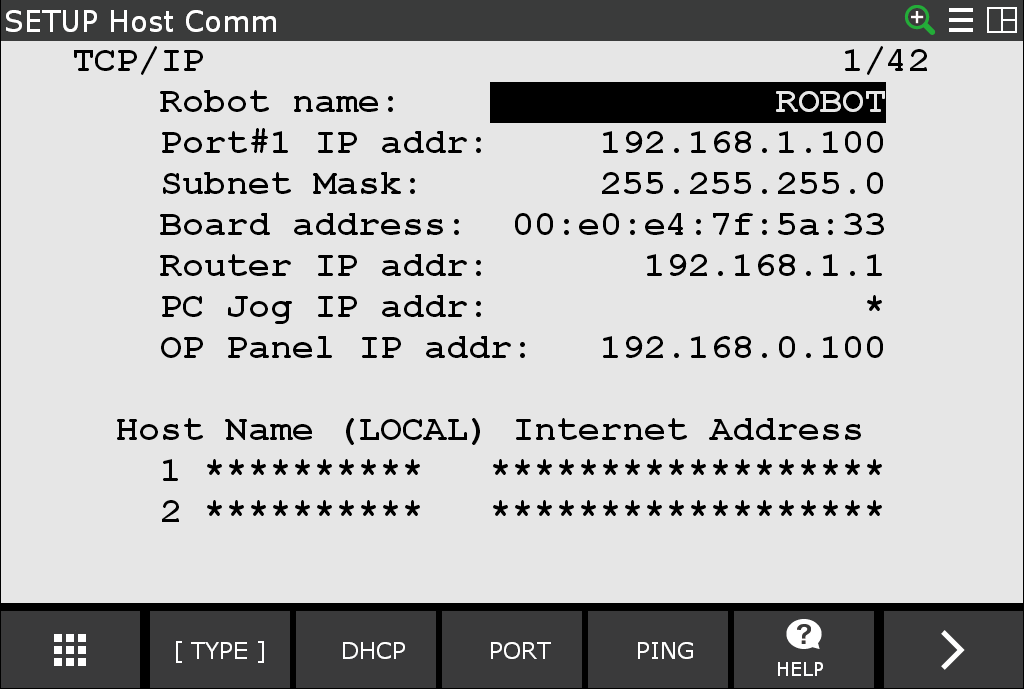
After defining your port, you now need to configure that port using the Host Communication screen.
Launching CRX-10iA with Driver
source /opt/ros/humble/setup.bash
source ~/ws_fanuc/install/setup.bash
ros2 launch fanuc_moveit_config fanuc_moveit.launch.py robot_model:=crx10ia robot_ip:="192.168.1.100"
You can command motion using the same IMarker workflow used earlier.
Note
See Controller Usage to learn more about the available controllers.
Setting I/O Values
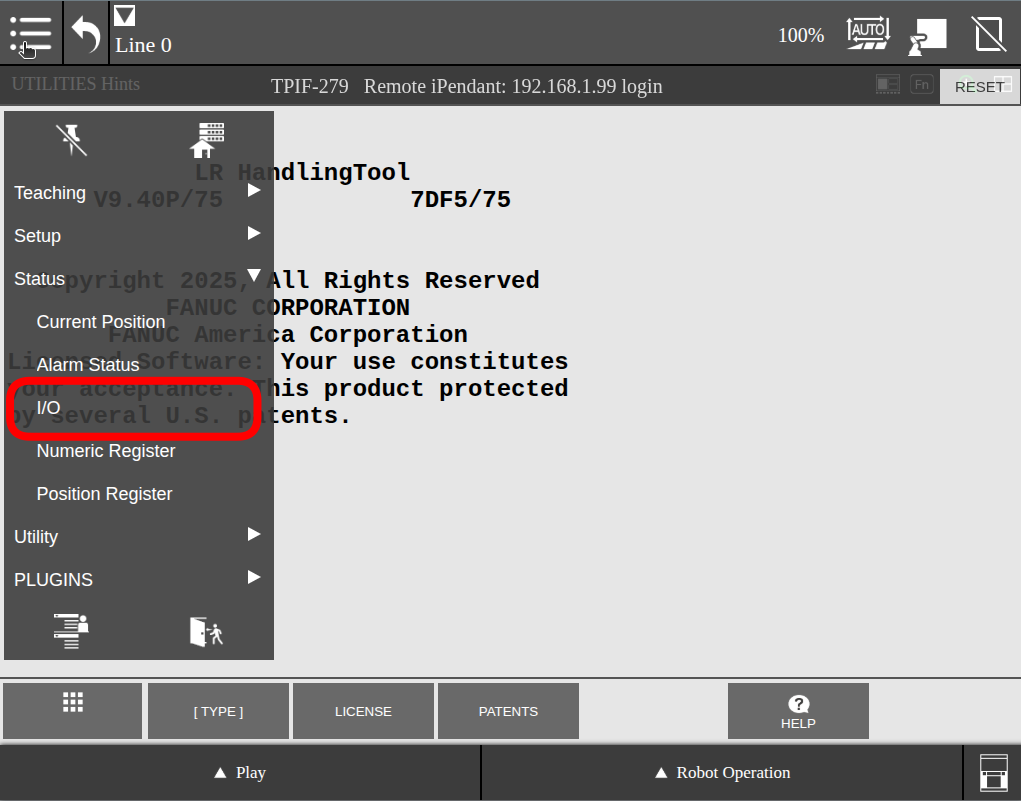
To monitor I/O status from pendant follow these instructions on the pendant.
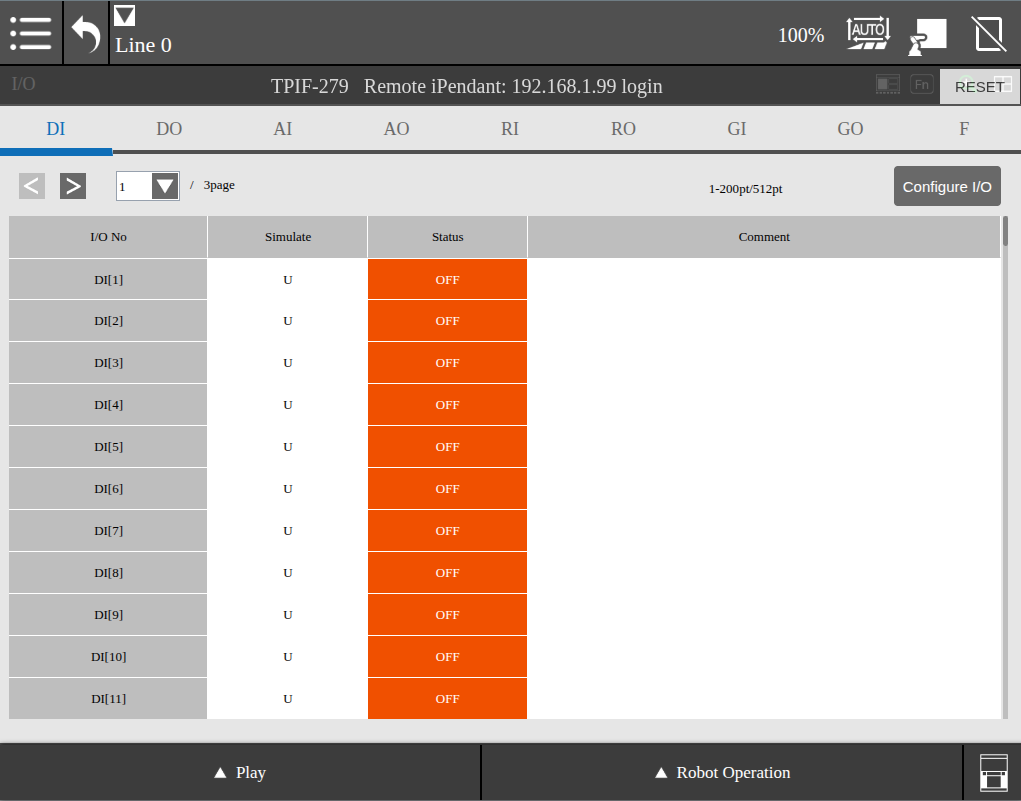
Then the following window will show all the I/O types and their current status.
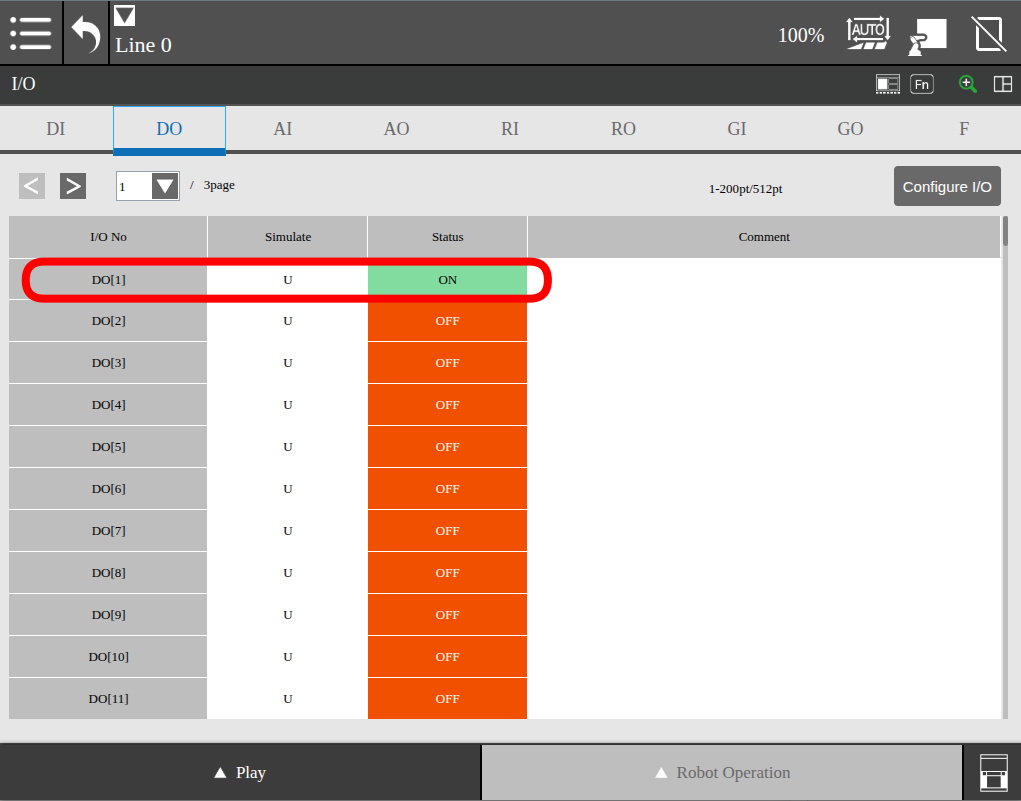
Now change a bool I/O via the ROS 2 CLI:
ros2 service call /fanuc_gpio_controller/set_bool_io fanuc_msgs/srv/SetBoolIO "{io_type: {type: 'DO'}, index: 1, value: true}"
The pendant will now show the I/O Status as ON:
Note
See Controller Customization to learn more about monitoring and setting I/O via ros2_control and the command line.
Obtain Support
Contact your local FANUC sales representative. To expedite your request, please provide information such as robot model, configuration, and application, so we can determine how best to support your request.